Showing posts with label makeovers. Show all posts

Tuesday, 12 February 2013

Hello, I'm a Pinterest Addict... and I'm stuck on an idea.

Yes it's true. We've all been there - intending to go on there for a few minutes, and an hour later still on there bursting with ideas, new menus, fashion, decorating projects and more. At the moment my main two Pinterest addiction areas are: Garden and Walk In Wardrobe ideas.

I'd like to do lots more to make the bedroom our haven, as with a busy work life and AJ approaching the Terrible Twos we certainly need a peaceful haven at the end of the day! The theme is purple, silver and vintage-y.

With that in mind here's one of my latest creations:


I found the frame at a car boot sale for £3 and took out the horrible oil painting inside, cleaned it up and bought a metre of crushed purple velvet from Dunhelm Mill. A couple of pins, and then two of my favourite necklaces - done!  Behind it is a scrap of the wallpaper we used in the bedroom, sorry it's not that visible, .but it reflects the light really well in the room.

Now I just need to finish a bigger version of this, a larger and slightly less decorative frame, which will hold all my other necklaces and earrings etc. Well, I say *all*, there's a handful, we don't spend much on ourselves these days. All of this is aspirational - might well cause me to completely revamp my wardrobe! So anyway I'm stuck on how to actually do it, though I have the frame and the velvet...

Apart from that my plan for the (small) walk in area involves this wallpaper at the far end:


Typically just my luck that when I go to Next and fall in love with it, I then discover that although they have the samples, they no longer stock it *at all* as it's sold out. SO then I end up being fleeced on eBay as people have started selling it as 'rare'. Still, I only need one roll hopefully and I do love it. So my tranquil haven is one step closer.

Now just to get wallpaper stripping and roll up my sleeves... think I would rather have a glass of wine!

Can anyone inspire me with jewellry storage ideas involving picture frames, vintage, small spaces?




Tuesday, 5 April 2011

Shabby Chic £15 TV unit and tiny steps approaching!


Hi everyone, hope April has started well for you!

Well lots has changed in our houehold over the past few months - hence the dip in my blog posts. The big news is... we are expecting the pitter patter of tiny money saving feet ;o)
That's right, so it means that money saving, money making, and home improvements are top priority on our list, even more so than before. So when energy permits, I have been undertaking various projects, to get the house ready for our little one.

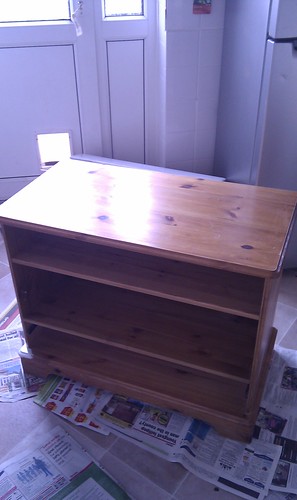
I have shown below my latest project - revamping a £15 nasty orange pine tv unit.

Here is the 'Before' image:

The process I followed this this unit was to: Clean the unit with a damp cloth, you can also use sugar soap depending on how dirty it is.
  • Wipe down any sanding residue and allow to dry.Sand down the whole unit, taking care with any detailing.
  • Paint with an initial coat of primer, to tone down the colour and save on paint later.
  • Choose a good paint suitable for wood - here I have used Wimbourne White by Farrow & Ball - not cheap, but I was painting some other chairs with it (also shown on this blog) so in a way it was more money saving than buying a new tin.
  • Use a good brush that doesn't lose bristles and make sure you wash it after each coat. If you are unable to wash it and the coats dry quite quickly, wrap the brush in some wet cloth rag, so that when you come to use it again a few hours later it won't have dried out. Never leave the brush with paint on it overnight (new brushes are very expensive).
  • Paint around 3-4 coats depending on the item, you may wish to finely sand each coat before applying the next coat, and allow to dry after cleaning any sanding residue.
For this unit, I did not paint the top, instead I used Danish oil - this required around 6 hours between coats. I applied 6 coats in total. Once fully dried, you need to polish the surface with a clean, lint free cloth as it really brings out the shine. Our stairwell hand rail also got this treatment and looks great plus feels so smooth to the touch.
Once finished, I bought 2 new clear heart shaped handles from ebay to really add a finishing touch and these cost £3.50 for two plus postage. Here is the finished product:


All in all, I think this project took me around 4 hours but it saved us buying a new unit, as this one fits the spot perfectly size wise, I just didn't like the colour. I have seen similar in Laura Ashley that cost alot of money, so we are pleased with the outcome!

Do you have any makeover tiips or a blog showing some projects? Do drop me a comment so we cal all learn and share tips!

Wednesday, 27 October 2010

Avocado be gone - sorry 1970's! Plus banishing bannister gloss...

Hi everyone,


Great to have your comments and as promised here is a little more about what we have been up to– my update today covers lots as you will see!

 
We have now completely sanded down the banister – the layers of gloss on there over the years were pure hell buut I am so pleased to have it fully stripped back now. Here are my suggestions for anyone looking to do a similar job!


1) Make sure that if you are trying to remove gloss, you use either a paint stripper or a mechanical sander with quite high abrasiveness. I used paint stripper then tried to sand the rest by hand – impossible with gloss! The paint stripper is a gel that can be brushed on, left for around 30 seconds, then scraped off. Cover the floor with newspaper and definately, definayely used gloves and cover all your skin, this is nasty stuff so open windows too. Make sure you use an old tin can, I washed out an old cat food tin, and an old brush for the gel. Once you have stripped all the goo of and it is dry, clean it down with white spirit.


2) Use a fine level of abrasiveness for the final sanding – I chose to do this by hand as the banister is pine, so needed a gentle touch not to dent the soft wood or remove too much.


3) You can stain the wood if you want to show the grain more. I may do this, though I am torn as I have also head that oiling it is good – I am not sure of the difference but I have stain, whereas I don’t have wood oil! Have also heard a lot about waxing, I have some beeswax at home which I have used for some other furniture. However have also heard that waxing is no good for areas that may get wet and as the bannister is near the bathroom it may be people have wet hands after washing, so I may have to oil the wood instead of waxing.


Any recommendations greatly received!


Our other project has been our bathroom, this started as a small job to simply replace the bathroom suite which was avocado… and has now turned into a full bathroom refit! Needless to say we were not expecting to pay for this level of work, these things just have a way of creeping up on you, each decision you make can lead to more expensive decisions. Be warned!


What we have learned from this is that:


1) Get at least 3 quotes from reputable traders from a site like checkatrade.co.uk. Try to use local companies, as they will charge less generally as there is less travel. Sometimes an out of town company may charge less if they have other jobs in the area the same week for example. Also worth getting contractor quotes for the whole job (they will do all the sub work too), then getting individual quotes for plubming, tiling, plastering etc and seeing which works out cheaper for you overall. Depends how much time you have as well because if you hire various different people for different jobs you will have to be more involved.


2) Once all quotes are in, don’t always go for the absolute cheapest – are they busy? Have they done this sort of work before? Just in chatting to them do you get the feeling they may take shortcuts? Of course it’s hard to foresee everything but some will charge little on the basis that they are in and out with little regard for details or your actual needs.


3) Always, always know the measurements and details of work before they arrive to quote. Give each person the same brief, so that when costs come back you are comparing like for like. We did not do this and with each contractor we learnt more, so by the end we had a better idea of what we actually needed, and so then called the first two to add more detail for a more comprehensive quote. Knowing the square footage for the tiling we wanted for example would have saved us time, and given us more accurate costs for the tiles.


4) Find out how long the job will take and when they will need access, how will you get keys to them, or will you take time off? If they are reliable they can perhaps collect keys from you the night before, and if you end up taking time off, factor this in as a cost, as you would surely have preferred to be having a nice day out instead!


5) Don’t walk into the big DIY warehouses and buy all your fittings and accessories. Take your time and plan ahead. We have bought only basic materials from there, flooring came from ebay, the bath panel came from another online company, taps came from another and the shower screen from ebay. A custom mirror and glass shelf will be bought locally for just £85, a fraction of ready made ones and these are custom size for our bathroom. We are also considering making our own bathroom cabinet, as these can be so expensive. If we make our own, it will fit our bathroom much better (we hope!) and make use of all available space, a premium in a small bathroom.


6) For finishes in a small bathroom, use mirrors, gloss furniture, pale colours and chrome if you can. This means not only light is reflected but also that the look can stay timeless, and you can just change towels/accessories to update it.

 
To save cash we are doing our own tiling, this saves around £240 in labour costs. Sure it may not be as perfect but we will have to live with that for the savings, and let’s face it, any improvement on the old bathroom is better than nothing! These will be plain white tiles, 40cm x 25cm, in a brick style layout.


So there you have it, I will hopefully add picks next time but as Flickr have changed how images can be used, I will have to find a new way to show you our latest adventures!


Please share your comments, thoughts and tips so we can all learn how to save cash and improve homes on a shoestring x

Monday, 9 August 2010

A £5 chair makeover in 60 minutes


Latest project - reupholstering a £5 chair, ultimately cost £11.25 and I have 3 more to do - much cleaner and fresher in the new green colour which is subtle but fits in well with our furniture. Not to mention much more comfortable!

The old set of chairs was purchased second hand and had red coverings but the wadding is very worn which makes sitting in the chairs uncomfortable.

I bought the material, pad and wadding from Dunhelm Mill which is a large household and fabric store. It was lovely to choose the material ourselves rather than buy a modern and expensive chair where this had been decided for us. We chose a thick material which allows more wear and chose a colour which we felt added light to the room and also worked with our table.

It took me around 1 hour as I was unfamiliar with the process but I think now around 45 minutes per chair will do, I might even finish off the pads next weekend.

The next project after that will be to tone down the varnish on all the chairs as I feel it is currently too dark and that make them feel more natural which I think will finish them off nicely.

Some light sandpaper then wire wool and possibly a light varnish may do the trick - I will need to research thoroughly first!

So now not only do we have more comfortable chairs, we also have lighter and prettier chairs for around 4 hours work - roll on next weekend so I can finish them off!

Sunday, 1 August 2010

A free find and instant mini bathroom makeover!

Hi everyone - as promised I am posting images of the bathroom cabinet I found and the quick improvement I made. It was just a single mirrored cabinet which needed some cleaning up and TLC and will certainly do us well for now - this is the Before image:


I gave it a good wash and a scrub down, let it dry, then used white glue to use up some remnants of some Cath Kidston wallpaper to at least cover up the badly worn shelves.


I also had some spare satin finish knobs, from when we bought knobs from ebay for the kitchen, so I replaced the small pine knobs that were on the unit with new shiny satin ones which look much nicer.


It is a very basic makeover, but cost nothing whatsoever apart from carrying the unit home and spending some time on it.


The bathroom is now decluttered and brighter as the unit has a mirror and is white so I'm very pleased with the results!

Wednesday, 28 July 2010

Shabby Chic kitchen progress & clueless about apples!

Hi everyone,
Another post to show my latest progress! As you can see from my last post kitchen was mostly dark - I have now repainted most cupboard fronts, just 4 more to go.

The door fittings came from ebay, ex MFI stock, and by buying in bulk, we were able to get them very inexpensively compared to standard DIY store prices.

Other progress is that we have obtained a full bathroom suite from Freecycle, white and fairly modern, completely free. This will be our next project as soon as money allows, possibly late Autumn, as our current suite is avocado green. It has saved us at least £200 on the main fittings, so we'll now keep an eye out for tiles at our local stores that are not too expensive. Of course if something suitable crops up on Freecycle that would be amazing too!

We have obtained a bathroom mirrored single cabinet for free from a house that was gutting their bathroom, it was in fairly poor condition inside but after a wash was acceptable. I then covered the shelves with some nice Cath Kidston paper and for now it's certainly much better than it was, and better than having nowhere to put things in! This would have cost at least £15.


Left you can see our crab apples have started to blush - we have no idea what to do with them! They are edible so hubby has started to take them to work, saving us around £1.50 per week, but I will look online for recipes as to what we can make.

Any recommendations for recipes, and indeed care of a crab apple tree? We are learning so much this year, it's hard to keep up with ourselves!

My next (small) project will be to repaint a Welsh dresser we purchased for £40. I will post pictures soon to ask for your inspiration and advice. My ideal result would be something like this (on right), which I saw a very talented MSE member complete on the Shabby Chic thread!

It looks amazing and I can only hope for such a result - only thing is I worry about the cost of paint and varnish - I guess it may cost around £30 but then at least we will have something we love - right now the pine colour is not my favourite!

Thanks for reading and do post your thoughts and comments, I will post another update very soon with hopefully a finished kitchen!

Thursday, 22 April 2010

The beginnings of a shabby chic kitchen

Hello everyone,

I have been busy with our kitchen - so thought I would show you the work that has progressed so far. The kitchen has dark wood units and deep blood red walls which were not doing it for me, so we have started to repaint the units as well as the walls. I would say that right now it's 60% complete, take a peek at the photos to see what I mean. The photo to the right is very early on before we even moved in.

You can see the dark wood units, deep red walls, carpet tiles on the floor plus to the right and old Economy7 heater on the wall.

Once we moved in and the cold weather had become less frosty, we decided one Saturday to completely remove all the kitchen carpet tiles, not olny were they unsightly but I feel unhygeinic in a kitchen, they came up very easily but did leave traces of carpet glue which are very hard to remove. As we are planning to redo the kitchen floor, we have left the floor as is for now. Now we just have to think of colours and types of flooring to put down and assess how much this will cost and when to do it.


Then below you can see the start of repainting the cupboards - I bought 'champagne' colour cupboard paint from the Crown range of paints, and although it does say 1 coat, have learnt I should never have trusted that and although the results are ok, would use a primer next time. I washed each door, dried it, then sanded down and once sanded and cleaned, applied around 4 coats to the back panels and 5 coats to the fronts.

My next project was to find suitable handles, which i did by first checking the DIY shops, then seeing if I could get similar things online for less. Sure enough, ebay came through for me and I found some shabby chic handles which were ex-MFI stock.
You can see to the right what the handles look like once applied, they add more light to the dark kitchen and I do love how well they go with the cream. At this point the walls were still nagging me, as the colour was too dark for the kitchen and i didn't feel veryt relaxed when cooking, too sinister a shade of red I think!

So whilst we carried on painting the units and applying handles, I started to think about colours that might go with the style we wanted which ultimately was shabby chic. I looked at many colour charts and we did purchase some samples as well, painting them onto the dark red walls to see what the finish might be like.

I chose a sage green colour, as I have heard this works well in kitchens due to opening the appetite! However I was also aware our north facing kitchen might feel cooler with green, so I was careful to choose a relatively medium/warm shade rather than a bluish green or heavy green. As you can see more units have been painted and we have started on the walls, but the red is still showing in places!

So far we have spent around £70 on cupboard painting and brushes, another £15 on wall paint and around £35 on handles. I think that for £120, it's enabling us to live with the kitchen for quite some time yet without wanting a brand new one, plus we are learning alot along the way and living with it like this will allow us to discover in time what a kitchen really needs to be like when we do buy new.