Friday, 25 February 2011

Fantastically Filling Flapjacks - Frugal fun!

Hi everyone,

Hope you are doing well and managing to cope in these cold Winter months! once March is here and the evenings get even longer I am sure we will all feel better... There are signs of Spring in our garden so lots of hope it won't take long now.

I wanted to share with you the idea of making your own flapjacks - maybe you already do, but to me this was a new idea and I am not much of a sweet tooth, but, I wanted to get something filling and not too expensive that would stop me spending in the shops. It's great to have as a snack at work or keep in a bag when travelling, or add to kids lunchboxes.

I have tried my own variations, and this is a good basic recipe to start with:
http://www.flapjackrecipe.com/healthy/

Porridge ensures you have slow release energy. It has less butter and less sugar than other recipes I have seen. What I tend to do is reduce the sugar a little more, and add raisins for example to increase sweetness more naturally. Also no need to use heavy maple syrup, honey is just fine.
To this I also add broken walnuts and also sunflower seeds, for added crunch (plus sunflower seeds are so inexpensive and very good for you.)

A tray that's low and square is best, mine happens to be rectangular from Sainsburys to I just pad out the mix.

They only take half an hour in our fan oven, and when you remove the tray you just need to score the mix lightly where you want to cut, allow to cool, then cut and place on a wire rack if you have one.

I do other variations like:

  • grated apple and cinnamon
  • mashed banana and walnut
  • cranberry and dessicated coconut
  • chocolate chips and hazelnut

Be warned, you can freeze them however they go down so quickly you may not have time to!
Experiment and have fun!

Friday, 28 January 2011

Cashback guide now online!

Hi all,

Brr, is it cold or what? Just thought i would write a quick note to say that in cooperation with a knowledgeable web colleague, I have now uploaded the cashback guide to:

http://www.earncash4clicks.com/index.php

Please drop by as it's likely to have the latest changes etc, hopefully it wil hep you earn more money this year, even though the cashback sites are cutting back a little more. But there is still money to be had, particularly if you persevere with the daily clicks and also sign up to any offers that are relevant to you.

Cashback on new bank accounts, new credit cards, changing energy, broadband or tv supplier such as Sky always tend to have good cashback bonuses up to around £120 for example. Even applying for your credit rating can earn as much as £17.

As with this here blog, please support the sponsors of any articles you enjoy each time you visit, thank you and hope January has started well for you!

Wednesday, 5 January 2011

Happy 2011 - here's to a money saving start!

Hi all and hope you had a lovely festive break and some wonderful pressies, without breaking the bank toooooo much!

This is  a short but sweet post to say hello and to recommend my top 10 tips for saving money straight away in 2011, so you're set for the year ahead for some inspiration - please share your tips with us here too!

1 - Make a fixed budget for shopping each month. Take cash out of the ATM if you need to - just don't go over it or buy bad tempting (expensive!) foods.
2 - Cook in bulk, and when you do, pad out the meals with red lentils for example in spag bol and chilli, or pasta shapes in soups, cous cous and things like bulgur wheat and green lentils in stews.
3 - Make a personal budget for yourself, again take cash out of the ATM each payday and make sure it lasts til the next one...
4 - Call your energy / tv / broadband cuppliers and renegotiate. Also check price comparison websites for life, car, pet, travel insurance to see what cashback you can get. See the cashback section on the right for more info, you can make hundreds of extra pounds this year. If you change energy supplier, do it via a cashback site.
5 - Reduce car travel, less petrol, less expenses and walking more helps feel that little bit better about the fact we don't go to the gym...
6 - Reduce gym costs if you do go - are you going at least 3 times a week? If not, maybe take up running, walking or exercise at home maybe by buying a 2nd hand cross trainer or step machine if you have little space.
7 - Get your other half to agree to cut back, maybe have a goal you are both aiming for, and one person controls the finances and had a good overview of what's what.
8 - Use a cashabck credit card when you can, if you have no debts. Many offer at least 1% cashback on all your purchases, which is a great bonus each year.
9 - Spend those Boots / Nectar / Tesco points you aren't using and get the maximum value out of them - see each website for details. Often on Nectar's website they offer better deals than just spending the points at Sainsburys of Argos for example.
10 - Keep a spending diary at http://www.spendingdiary.com/ - easy and quick to log into, super easy to use. Then you can see what's being spent where of your personal monthly allowance, or shopping budget for example.
11 - A bonus one - sall stuff you no longer want or need - unwanted Christmas pressies? Ebay or Amazon them, or see musicmagpie.co.uk, or go to a boot fair. You may also want to Freecycle items if they are unsellable - someone's junk is almost always someone else's treasure. We got a free bathroom suite, ironing board, cd player, 12 magazines, books and much more that way in the past 12 months.

Any idead and tips you would like to share are most welcome - what's the most significant money saving tip for you?

Happy 2011 and thanks for supporting this blog - it inspires me to keep saving money and hopefully help others too along the way!

Wednesday, 1 December 2010

Heated White Christmas? 1st year in our new home

Hello everyone and apologies for the delay - the reason being that we have finally finished out bathroom (and learnt alot about contractors and project management in the process) and I have also been learning to drive this Summer so am preparing for my test.

The bathroom has been done on as much shoestring as we could find... the flooring is black glittery industrial vinly, from ebay, the shower screen is glass and rounded on the top, also from ebay... bath and sink came from Freecycle, and tiles were cheapest we could find at B&Q. We also did our own tiling. Even so, this was soooo much more expensive than expected, so we were naiive in our hopes for costs! Even so, we are so pleased to have done it now and hope to have finally paid it off this month.

Last year around this time, we were 2 weeks away from moving in. When we moved in, it had snowed the day before so we had ice to content with, a massive hill, and freezing temperatures. This alongside the cleaning of our old (rented) property and the joys of dealing with the landlady to get our much needed deposit back. Plus when we finally did move in (after a second bout of snow, moving in one single box at a time as we slipped and slid up the hill), we had NO central heating.

So now, we are enjoying having heating, warm carpets and a bathroom we can be proud of. Year 1 has definately been expensive and testing, but we made it and we hope that year two will bring less DIY and more fun and enjoying adventures!

I will soon also update you all about my new cashback guide, it will be much easier to get the information and see which sites are best - please see the right hand side menu for now for the sites I have currently listed and the basic technique.

Stay warm and i will blog again soon when I have an update on the next stage!

Wednesday, 27 October 2010

Avocado be gone - sorry 1970's! Plus banishing bannister gloss...

Hi everyone,


Great to have your comments and as promised here is a little more about what we have been up to– my update today covers lots as you will see!

 
We have now completely sanded down the banister – the layers of gloss on there over the years were pure hell buut I am so pleased to have it fully stripped back now. Here are my suggestions for anyone looking to do a similar job!


1) Make sure that if you are trying to remove gloss, you use either a paint stripper or a mechanical sander with quite high abrasiveness. I used paint stripper then tried to sand the rest by hand – impossible with gloss! The paint stripper is a gel that can be brushed on, left for around 30 seconds, then scraped off. Cover the floor with newspaper and definately, definayely used gloves and cover all your skin, this is nasty stuff so open windows too. Make sure you use an old tin can, I washed out an old cat food tin, and an old brush for the gel. Once you have stripped all the goo of and it is dry, clean it down with white spirit.


2) Use a fine level of abrasiveness for the final sanding – I chose to do this by hand as the banister is pine, so needed a gentle touch not to dent the soft wood or remove too much.


3) You can stain the wood if you want to show the grain more. I may do this, though I am torn as I have also head that oiling it is good – I am not sure of the difference but I have stain, whereas I don’t have wood oil! Have also heard a lot about waxing, I have some beeswax at home which I have used for some other furniture. However have also heard that waxing is no good for areas that may get wet and as the bannister is near the bathroom it may be people have wet hands after washing, so I may have to oil the wood instead of waxing.


Any recommendations greatly received!


Our other project has been our bathroom, this started as a small job to simply replace the bathroom suite which was avocado… and has now turned into a full bathroom refit! Needless to say we were not expecting to pay for this level of work, these things just have a way of creeping up on you, each decision you make can lead to more expensive decisions. Be warned!


What we have learned from this is that:


1) Get at least 3 quotes from reputable traders from a site like checkatrade.co.uk. Try to use local companies, as they will charge less generally as there is less travel. Sometimes an out of town company may charge less if they have other jobs in the area the same week for example. Also worth getting contractor quotes for the whole job (they will do all the sub work too), then getting individual quotes for plubming, tiling, plastering etc and seeing which works out cheaper for you overall. Depends how much time you have as well because if you hire various different people for different jobs you will have to be more involved.


2) Once all quotes are in, don’t always go for the absolute cheapest – are they busy? Have they done this sort of work before? Just in chatting to them do you get the feeling they may take shortcuts? Of course it’s hard to foresee everything but some will charge little on the basis that they are in and out with little regard for details or your actual needs.


3) Always, always know the measurements and details of work before they arrive to quote. Give each person the same brief, so that when costs come back you are comparing like for like. We did not do this and with each contractor we learnt more, so by the end we had a better idea of what we actually needed, and so then called the first two to add more detail for a more comprehensive quote. Knowing the square footage for the tiling we wanted for example would have saved us time, and given us more accurate costs for the tiles.


4) Find out how long the job will take and when they will need access, how will you get keys to them, or will you take time off? If they are reliable they can perhaps collect keys from you the night before, and if you end up taking time off, factor this in as a cost, as you would surely have preferred to be having a nice day out instead!


5) Don’t walk into the big DIY warehouses and buy all your fittings and accessories. Take your time and plan ahead. We have bought only basic materials from there, flooring came from ebay, the bath panel came from another online company, taps came from another and the shower screen from ebay. A custom mirror and glass shelf will be bought locally for just £85, a fraction of ready made ones and these are custom size for our bathroom. We are also considering making our own bathroom cabinet, as these can be so expensive. If we make our own, it will fit our bathroom much better (we hope!) and make use of all available space, a premium in a small bathroom.


6) For finishes in a small bathroom, use mirrors, gloss furniture, pale colours and chrome if you can. This means not only light is reflected but also that the look can stay timeless, and you can just change towels/accessories to update it.

 
To save cash we are doing our own tiling, this saves around £240 in labour costs. Sure it may not be as perfect but we will have to live with that for the savings, and let’s face it, any improvement on the old bathroom is better than nothing! These will be plain white tiles, 40cm x 25cm, in a brick style layout.


So there you have it, I will hopefully add picks next time but as Flickr have changed how images can be used, I will have to find a new way to show you our latest adventures!


Please share your comments, thoughts and tips so we can all learn how to save cash and improve homes on a shoestring x

Tuesday, 19 October 2010

Autumn is here - time for chutney, roasts and saving money!

Hi all,
Sorry for the delay - busy few weeks, more DIY and also work aplenty!
I promise to update soon and hope everyone is well - my latest project is the stair bannister and redoing the bathroom, which we are obviously trying to do as frugally as possible...

Monday, 9 August 2010

A £5 chair makeover in 60 minutes


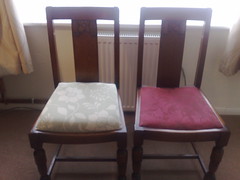
Latest project - reupholstering a £5 chair, ultimately cost £11.25 and I have 3 more to do - much cleaner and fresher in the new green colour which is subtle but fits in well with our furniture. Not to mention much more comfortable!

The old set of chairs was purchased second hand and had red coverings but the wadding is very worn which makes sitting in the chairs uncomfortable.

I bought the material, pad and wadding from Dunhelm Mill which is a large household and fabric store. It was lovely to choose the material ourselves rather than buy a modern and expensive chair where this had been decided for us. We chose a thick material which allows more wear and chose a colour which we felt added light to the room and also worked with our table.

It took me around 1 hour as I was unfamiliar with the process but I think now around 45 minutes per chair will do, I might even finish off the pads next weekend.

The next project after that will be to tone down the varnish on all the chairs as I feel it is currently too dark and that make them feel more natural which I think will finish them off nicely.

Some light sandpaper then wire wool and possibly a light varnish may do the trick - I will need to research thoroughly first!

So now not only do we have more comfortable chairs, we also have lighter and prettier chairs for around 4 hours work - roll on next weekend so I can finish them off!

Sunday, 1 August 2010

A free find and instant mini bathroom makeover!

Hi everyone - as promised I am posting images of the bathroom cabinet I found and the quick improvement I made. It was just a single mirrored cabinet which needed some cleaning up and TLC and will certainly do us well for now - this is the Before image:


I gave it a good wash and a scrub down, let it dry, then used white glue to use up some remnants of some Cath Kidston wallpaper to at least cover up the badly worn shelves.


I also had some spare satin finish knobs, from when we bought knobs from ebay for the kitchen, so I replaced the small pine knobs that were on the unit with new shiny satin ones which look much nicer.


It is a very basic makeover, but cost nothing whatsoever apart from carrying the unit home and spending some time on it.


The bathroom is now decluttered and brighter as the unit has a mirror and is white so I'm very pleased with the results!

Wednesday, 28 July 2010

Shabby Chic kitchen progress & clueless about apples!

Hi everyone,
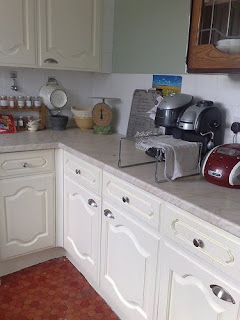
Another post to show my latest progress! As you can see from my last post kitchen was mostly dark - I have now repainted most cupboard fronts, just 4 more to go.

The door fittings came from ebay, ex MFI stock, and by buying in bulk, we were able to get them very inexpensively compared to standard DIY store prices.

Other progress is that we have obtained a full bathroom suite from Freecycle, white and fairly modern, completely free. This will be our next project as soon as money allows, possibly late Autumn, as our current suite is avocado green. It has saved us at least £200 on the main fittings, so we'll now keep an eye out for tiles at our local stores that are not too expensive. Of course if something suitable crops up on Freecycle that would be amazing too!

We have obtained a bathroom mirrored single cabinet for free from a house that was gutting their bathroom, it was in fairly poor condition inside but after a wash was acceptable. I then covered the shelves with some nice Cath Kidston paper and for now it's certainly much better than it was, and better than having nowhere to put things in! This would have cost at least £15.


Left you can see our crab apples have started to blush - we have no idea what to do with them! They are edible so hubby has started to take them to work, saving us around £1.50 per week, but I will look online for recipes as to what we can make.

Any recommendations for recipes, and indeed care of a crab apple tree? We are learning so much this year, it's hard to keep up with ourselves!

My next (small) project will be to repaint a Welsh dresser we purchased for £40. I will post pictures soon to ask for your inspiration and advice. My ideal result would be something like this (on right), which I saw a very talented MSE member complete on the Shabby Chic thread!

It looks amazing and I can only hope for such a result - only thing is I worry about the cost of paint and varnish - I guess it may cost around £30 but then at least we will have something we love - right now the pine colour is not my favourite!

Thanks for reading and do post your thoughts and comments, I will post another update very soon with hopefully a finished kitchen!

Thursday, 15 July 2010

Summer plans

Hello everyone and sorry for the delay. With work and high rennovation costs, we've had a lot on, which I hope end of July and early August will finally calm down.

We have been able to do a lot in our new home these past few months, but not only is it a costly time but so tiring as well! You also learn how inadequate you can feel when DIY is daunting... however it's a great learning curve. My next project is to re-cover some £5 wooden chairs we bought second hand, then repaint a bathroom, all as inexpensively as we can to try and claw back some of what we have spent.

My next post will hopefully show some recovered chairs with before and after shots, and some re-painted bathroom - with before and after shots too! However I know I need to finish off the kitchen first - still a few doors to go, so some elbow grease and a final push needed.

Does anyone else here have some porojects on the go - or planned for the future?